Sitecore 9: Creating Activity Type UI and Editor
In post 1 and post 2 we've described how to create custom Marketing Automation Action, backend logic and definition item for Activity Type. Now let me describe steps to create Activity Type UI and Editor
Again, Sitecore documentation has quite detailed article describing steps to add activity type to the Marketing Automation UI. However, you may find it hard to combine all UI elements together and make it work. If you have Angular/TypeScript developer sitting next to you, call him now to help you understand all peculiarities! :)
As suggested by documentation, we start by creating NPM project and package.json where we define project metadata and dependencies.
package.json
{
  "name": "demo9.features.sendemailpromo",
  "version": "0.0.0",
  "description": "Sitecore 9 Marketing Automation Demo",
  "private": true,
  "angular-cli": {},
  "scripts": {
    "predev": "npm install && rimraf ./codegen/",
    "dev": "ngc -p ./src/tsconfig.aot.json && npm run build",
    "prebuild": "rimraf ./dist/",
    "build": "webpack --display-error-details"
  },
  "dependencies": {
    "@angular/common": "4.3.5",
    "@angular/core": "4.3.5",
    "@angular/forms": "4.3.5",
    "@angular/http": "4.3.5",
    "@angular/platform-browser": "^4.4.0-RC.0",
    "@ngx-translate/core": "^7.2.0",
    "@sitecore/ma-core": "file:C:/yourpathto/ma-core",
    "rxjs": "^5.4.3",
    "zone.js": "^0.8.17"
  },
  "devDependencies": {
    "@angular/compiler": "4.3.5",
    "@angular/compiler-cli": "4.3.5",
    "copyfiles": "^1.2.0",
    "rimraf": "^2.6.1",
    "ts-loader": "^2.3.4",
    "typescript": "^2.4.2",
    "webpack": "^3.5.5"
  }
}
Make sure you update the reference to @sitecore/ma-core package. If you have Sitecore 9 installed, you will find it located here
<sitecoreroot>\sitecore\shell\client\Applications\MarketingAutomation\packages\ma-core
Notice we defined a number of scripts commands that will run at various times in the lifecycle of the package.
Next we will define plugin class and this is where we jump to the world of TypeScript!
As Sitecore documentation suggests:
The plugin class is the plugin’s façade that contains the metadata that the Marketing Automation application uses to discover and register the activities that are configured in the plugin.
/src/demo9-send-promot-email.plugin.ts
import { Plugin } from '@sitecore/ma-core';
import { SendPromoEmailActivity } from './demo9-send-promo-email/send-promo-email-activity';
import { SendPromoEmailModuleNgFactory } from '../codegen/demo9-send-promo-email/send-promo-email-module.ngfactory';
import { ReadonlyEditorComponent } from '../codegen/demo9-send-promo-email/editor/readonly-editor.component';

// Use the @Plugin decorator to define all the activities the module contains.
@Plugin({
    activityDefinitions: [
        {
            // The ID must match the ID of the activity type description definition item in the CMS.
        id: 'f8b0dffd-e3d3-4ea2-b3fa-8bfcaa4e41da',
            activity: SendPromoEmailActivity,
            editorComponenet: ReadonlyEditorComponent,
            editorModuleFactory: SendPromoEmailModuleNgFactory
        }
    ]
})
export default class SendPromoEmailPlugin {}
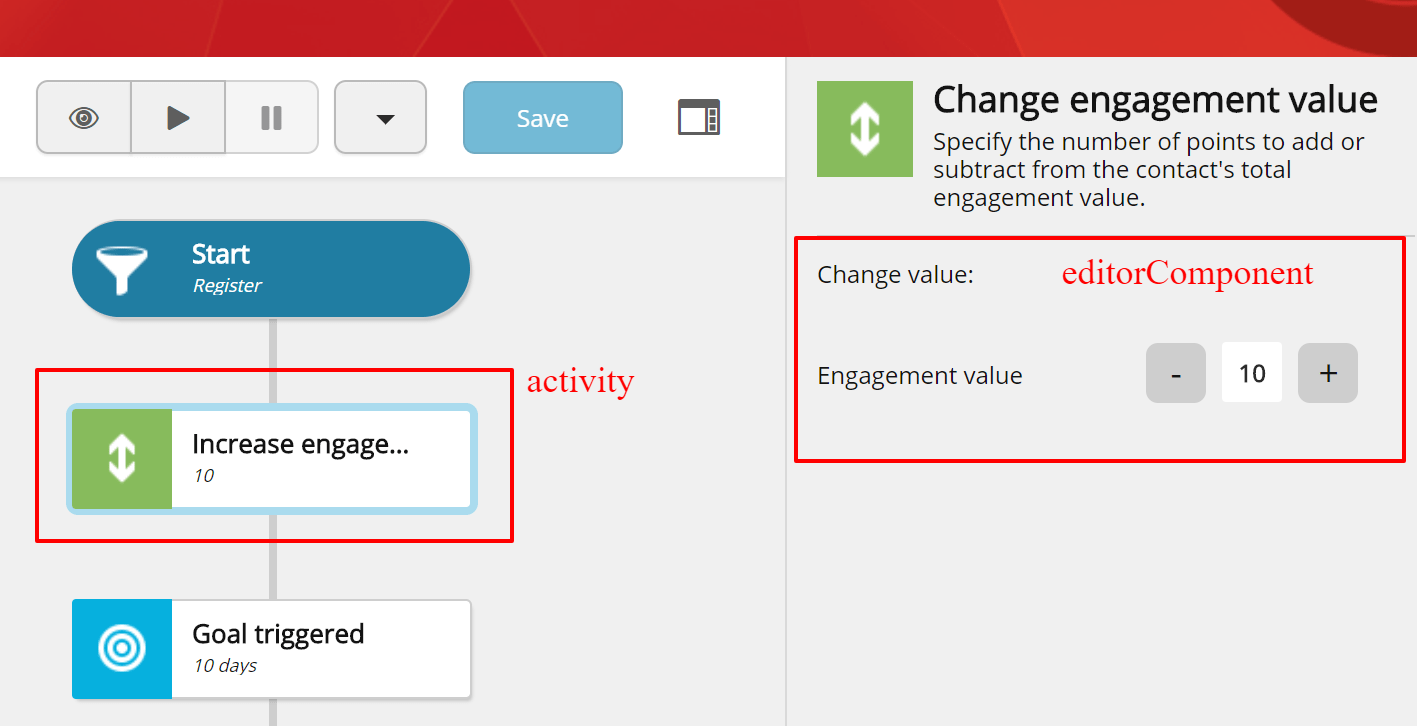
So, what exactly do we define here? Id is the ID of the Sitecore activity definition item we created earlier. activity is a reference to SendPromoEmailActivity typescript class that we will create in a few moments. editorComponent is another typescript class reference to editor component. editorModuleFactory is a reference to a generated code artifact. After you run the angular compiler, it generates a factory for each module.
Let’s create the missing classes and components.
Because our action has one (default) outgoing path, we create our activity by extending SingleItem activity class.
/src/demo9-send-promo-email/send-promo-email-activity.ts
import { SingleItem} from '@sitecore/ma-core';

export class SendPromoEmailActivity extends SingleItem {
    getVisual(): string {
        const subTitle = 'Send promo email';
        const cssClass = this.isDefined ? '' : 'undefined';

        return `
            <div class="viewport-readonly-editor marketing-action ${cssClass}">
                <span class="icon">
                    <img src="/~/icon/OfficeWhite/32x32/mail_forward.png" />
              </span>
                <p class="text with-subtitle" title="Send Promo Email">
                    Send Promo Email
                    <small class="subtitle" title="${subTitle}">${subTitle}</small>
                </p>
            </div>
        `;
    }

    get isDefined(): boolean {
            return true;
    }
}
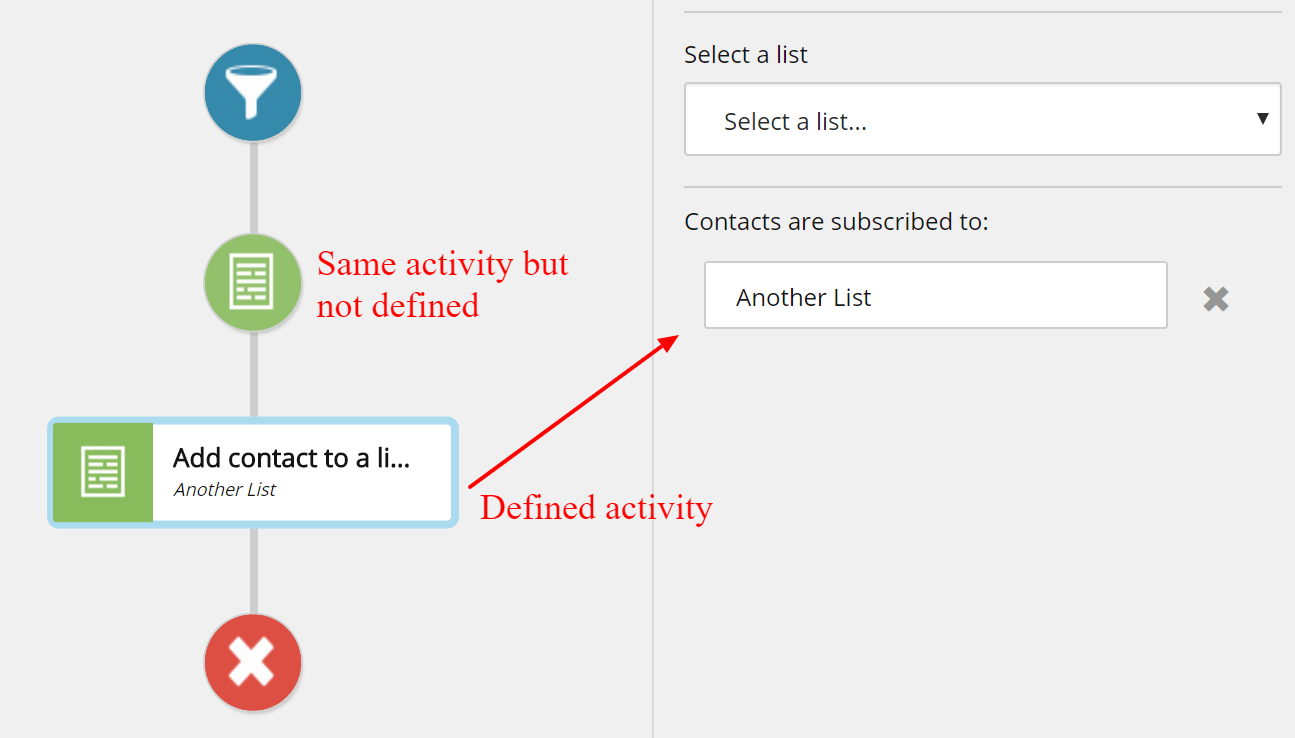
Notice, that because we have 0 parameters, our activity is always defined, in other words, marketers don't need to specify any activity parameters to make it work. isDefined also helps making automation plan more user friendly for marketers. In the following example Add contact to a list activity is considered defined if it has at least one Contact List selected.
Next, we need to create editorComponent class. Even though our activity does not have any parameters to edit, such component class is mandatory.
/src/demo9-send-promo-email/editor/readonly-editor.component.ts
import { Component, OnInit, Injector } from '@angular/core';
import {
               EditorBase
    } from '@sitecore/ma-core';

@Component({
    selector: 'readonly-editor',
            template: `
        <section class="content">
            <div class="form-group">
                <div class="row readonly-editor">
                    <label class="col-6 title">Readonly editor</label>
                    <div class="col-6">

                   </div>
                </div>
            </div>
        </section>
    `,
    //CSS Styles are ommitted for brevity
    styles: ['']
})

export class ReadonlyEditorComponent extends EditorBase implements OnInit {

    constructor(private injector: Injector) {
        super();
    }

    ngOnInit(): void { }

    serialize(): any {
        return {    };
    }
}
In a different scenario, you will need to make use of parameters and operate such parameters. You can also make use of the following services that are provided by the Marketing Automation application through dependency injection: Alert Service, Translate Service, Activity Data Service, Server Connection Service.
You will also need to create the following module class.
/src/demo9-send-promo-email/send-promo-email-module.ts
import { NgModule } from '@angular/core';
import { CommonModule } from '@angular/common';
import { ReadonlyEditorComponent } from './editor/readonly-editor.component';

@NgModule({
    imports: [
        CommonModule
    ],
    declarations: [ReadonlyEditorComponent],
    entryComponents: [ReadonlyEditorComponent]
})
export class SendPromoEmailModule { }
You will further need to create configuration for AOT (The Ahead of Time compiler)
/src/tsconfig.aot.json
{
    "compilerOptions": {
        "emitDecoratorMetadata": true,
        "experimentalDecorators": true,
        "target": "es5",
        "module": "es2015",
        "moduleResolution": "node",
        "removeComments": true,
        "sourceMap": true,
        "outDir": "../codegen",
        "rootDir": "",
        "declaration": true,
        "lib": [
            "es2016",
            "dom"
        ]
    },
    "exclude": [
        "**/*.spec.ts",
        "test.ts"
    ],
    "files": [
        "demo9-send-promo-email/send-promo-email-module.ts"
    ],
    "angularCompilerOptions": {
        "genDir": "../codegen",
        "skipMetadataEmit": true,
        "generateCodeForLibraries": true
    }
}
Finally, we need to create webpack configuration where our plugin is defined as an entry.
webpack.config.js
var path = require('path');

module.exports = {
    entry: './src/demo9-send-promo-email.plugin.ts',
    module: {
        rules: [
            {
                test: /\.ts$/,
                use: 'ts-loader',
                exclude: path.resolve(__dirname, "node_modules")
            }
        ]
    },
    resolve: {
        extensions: [".ts", ".js"]
    },
    output: {
        path: path.resolve(__dirname, 'dist'),
        filename: 'sendpromoemail.plugin.js',
        library: "publishActivities",
        libraryTarget: "umd"
    },
    devtool: 'source-map',
    externals: [
        "@sitecore/ma-core",
        "@angular/core",
        "@ngx-translate/core"
    ]
};
Now we can run npm script to build and bundle our plugin.
Run the following command > npm run dev
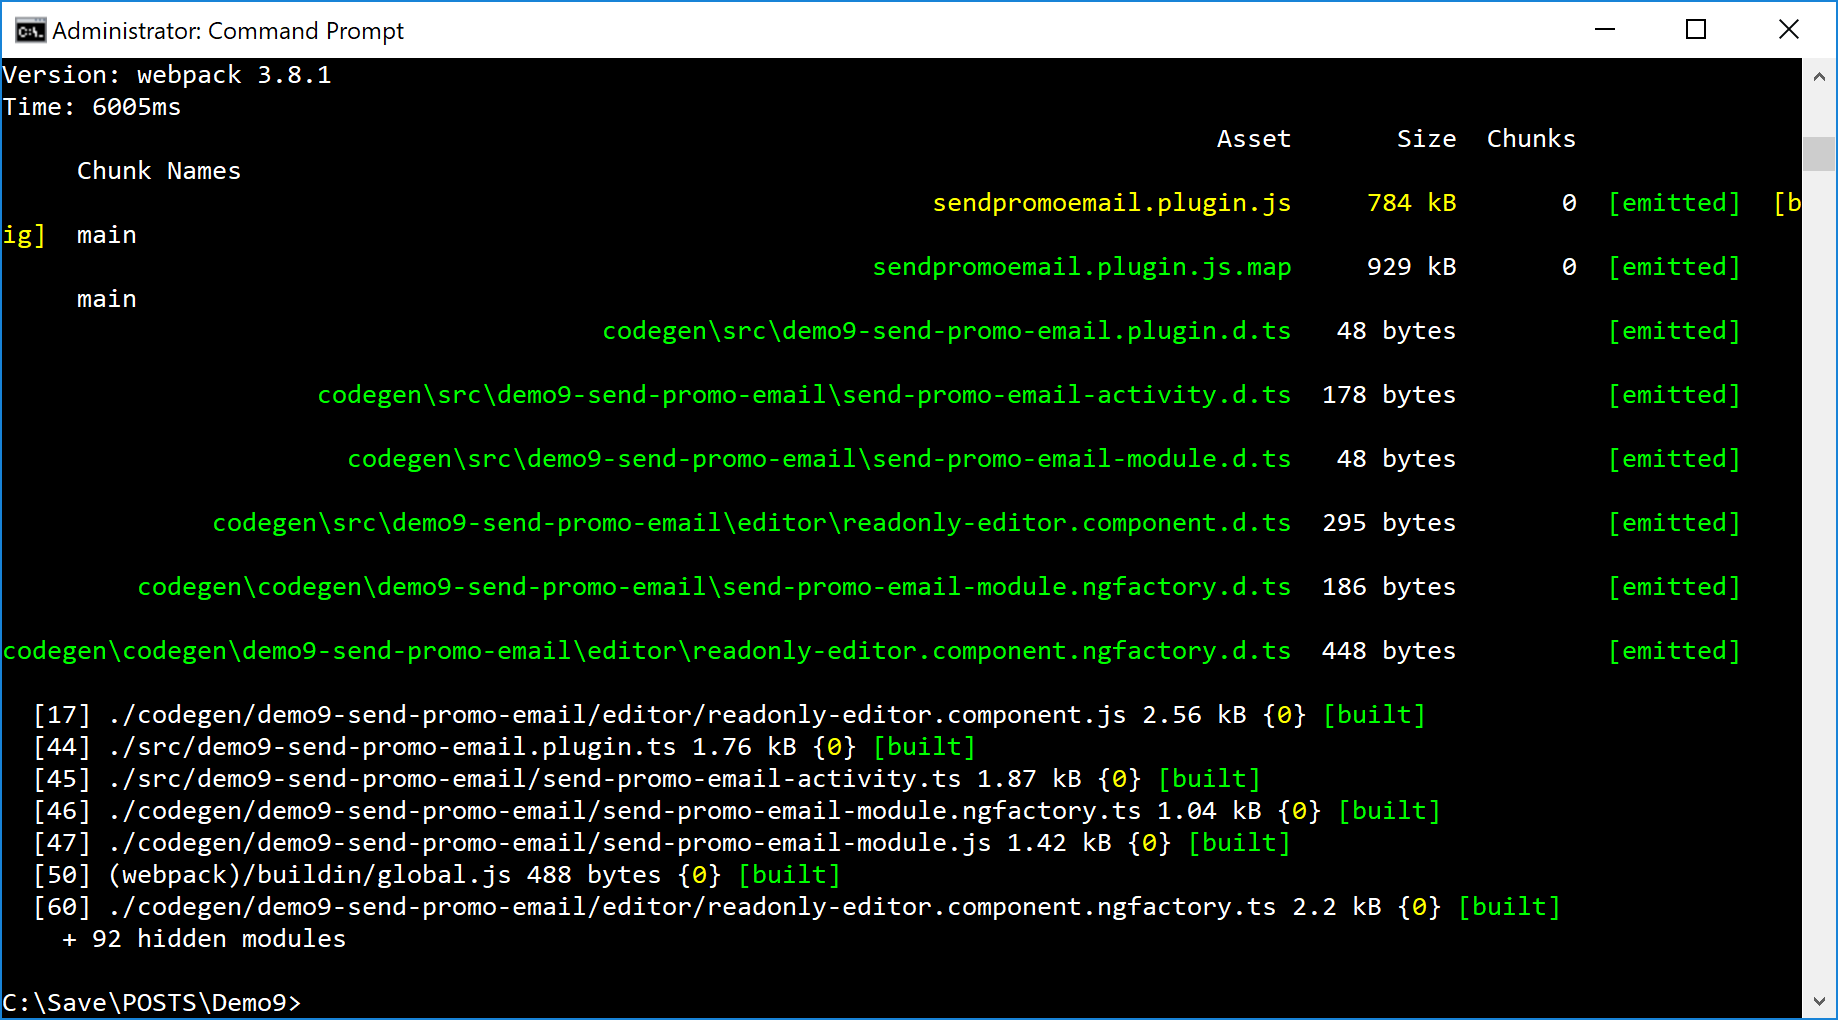
Once successfully finished, you will find sendpromoemail.plugin.js in the /dist folder. You can find the full source code on GitHub.
Browse to part 4 to learn how to deploy Activity Type to Sitecore UI and Marketing Automation engine.
Read more on marketing automation and Sitecore 9:
- Creating Activity Type backend logic and definition item
- Deploying Activity Type to Sitecore UI and Marketing Automation engine
- Custom Marketing Automation Action - Introduction
- Marketing Automation API - enrolling contacts
- Marketing Automation - Repeated and concurrent contact enrollments
Do you need help with your Sitecore project?