﻿#### 

Past years have proven that the headless approach becomes popular and evolves rapidly along with a number of technologies that we can use to build and run our front-end part of the solution which is also called “rendering host”. In this article I will primarily write about running a node.js based rendering host in Azure Kubernetes Services (AKS) and in windows based containers specifically.

Working with containerized solutions locally, in Docker, we utilize a simplified way to run our next.js application just mirroring a code stored in our locale into the container. So, during a build, we don’t copy the project code to image and it is not compiled to be run independently. This approach works only locally, where we store the code and run it on the same machine.

This post requires a basic docker knowledge on how to [build](https://docs.docker.com/build) and [compose](https://docs.docker.com/compose) the application.

**Docker-compose.yml** and **Dockerfile** for this setup looks like below:

| version: "2.4"<br>
            <br>
            services:<br>
            <br>
              # A Windows-based nodejs base image<br>
              nodejs:<br>
                image: ${REGISTRY}${COMPOSE\_PROJECT\_NAME}-nodejs:${VERSION:-latest}<br>
                build:<br>
                  context: ./docker/build/nodejs<br>
                  args:<br>
                    PARENT\_IMAGE: mcr.microsoft.com/windows/servercore:1809<br>
                    NODEJS\_VERSION: ${NODEJS\_VERSION}<br>
                scale: 0<br>
            <br>
              rendering:<br>
                image: ${REGISTRY}${COMPOSE\_PROJECT\_NAME}-rendering:${VERSION:-latest}<br>
                build:<br>
                  context: ./docker/build/rendering<br>
                  target: ${BUILD\_CONFIGURATION}<br>
                  args:<br>
                    PARENT\_IMAGE: ${REGISTRY}${COMPOSE\_PROJECT\_NAME}-nodejs:${VERSION:-latest}    <br>
                volumes:<br>
                  - .\src\Project\DemoProject\nextjs:C:\app<br>
                environment:<br>
                  SITECORE\_API\_HOST: "http://cd"<br>
                  NEXTJS\_DIST\_DIR: ".next-container"<br>
                  PUBLIC\_URL: "https://${RENDERING\_HOST}"<br>
                  JSS\_EDITING\_SECRET: ${JSS\_EDITING\_SECRET}<br>
                depends\_on:<br>
                  - cm<br>
                  - nodejs<br>
                labels:<br>
                  - "traefik.enable=true"<br>
                  - "traefik.http.routers.rendering-secure.entrypoints=websecure"<br>
                  - "traefik.http.routers.rendering-secure.rule=Host(`${RENDERING_HOST}`)"<br>
                  - "traefik.http.routers.rendering-secure.tls=true" |
| --- |

In the *docker-compose* file we can see two services required for services (images) to be running in docker: 

- **nextjs** - simple, windows base image where we install node.js server for further running our next.js app.
- **rendering** - I call it “pseudo-container” because it doesn’t include any code and uses volumes to mirror the code from the host machine to the image.

Dockerfile for nextjs is stored by the **./docker/build/nodejs** (as defined in docker-compose) path and looks like below: 

| # escape=`<br>
            <br>
            #<br>
            # Basic Windows node.js image for use as a parent image in the solution.<br>
            #<br>
            <br>
            ARG PARENT\_IMAGE<br>
            FROM $PARENT\_IMAGE<br>
            <br>
            ARG NODEJS\_VERSION<br>
            <br>
            WORKDIR c:\build<br>
            RUN curl.exe -sS -L -o node.zip https://nodejs.org/dist/v%NODEJS\_VERSION%/node-v%NODEJS\_VERSION%-win-x64.zip"<br>
            RUN tar.exe -xf node.zip -C C:\<br>
            RUN move C:\node-v%NODEJS\_VERSION%-win-x64 c:\node<br>
            RUN del node.zip<br>
            <br>
            USER ContainerAdministrator<br>
            RUN SETX /M PATH "%PATH%;C:\node"<br>
            USER ContainerUser |
| --- |

rendering Dockerfile is much simpler:

| # escape=`<br>
            <br>
            #<br>
            # Development-only image for running Next.js in a containerized environment.<br>
            # Assumes that the Next.js rendering host source is mounted to c:\app.<br>
            #<br>
            <br>
            ARG PARENT\_IMAGE<br>
            FROM ${PARENT\_IMAGE} as debug<br>
            <br>
            WORKDIR /app<br>
            <br>
            EXPOSE 3000<br>
            ENTRYPOINT "npm run start:connected" |
| --- |

We can see that the rendering Dockerfile doesn’t perform any build and only runs “**npm run start:connected**” when the container is mounted. But the image that we get as a result can’t be run in Kubernetes. Kubernetes only runs images and doesn’t perform builds. Which means we need to prepare all required images using CI/CD processes and push them to a Container Registry. In this case, we still need a docker-compose file. I usually create it separately for AKS and call it like **docker-compose.aks.yml** because it is quite specific for AKS:

| version: "2.4"<br>
            <br>
            services:<br>
            <br>
              # A Windows-based nodejs base image<br>
              nodejs:<br>
                image: ${REGISTRY}${COMPOSE\_PROJECT\_NAME}-nodejs:${VERSION:-latest}<br>
                build:<br>
                  context: ./docker/build/nodejs<br>
                  args:<br>
                    PARENT\_IMAGE: ${NODEJS\_PARENT\_IMAGE}<br>
                    NODEJS\_VERSION: ${NODEJS\_VERSION}<br>
                scale: 0<br>
             <br>
              rendering:<br>
             image: ${REGISTRY}${COMPOSE\_PROJECT\_NAME}-rendering:${VERSION:-latest}<br>
                build:<br>
                  context: ./src/Project/DemoProject/nextjs<br>
                  dockerfile: Dockerfile<br>
                  args:<br>
                    PARENT\_IMAGE: ${REGISTRY}${COMPOSE\_PROJECT\_NAME}-nodejs:${VERSION:-latest} |
| --- |

In the code above we can still see two services. nodejs is exactly the same as for local setup and uses the same Dockerfile as I mentioned at the beginning of the article. The rendering Dockerfile, at the same time, represents a multi-stage build of next.js app. During the build we install npm packages, copy node\_modules to the image, perform next.js build and, finally, copy next.js artifacts:

| ARG PARENT\_IMAGE<br>
            <br>
            FROM ${PARENT\_IMAGE} as dependencies<br>
            WORKDIR /app<br>
            COPY package.json ./<br>
            RUN npm install<br>
            <br>
            FROM ${PARENT\_IMAGE} as builder<br>
            WORKDIR /app<br>
            COPY . .<br>
            COPY --from=dependencies /app/node\_modules ./node\_modules<br>
            ENV NEXT\_TELEMETRY\_DISABLED 1<br>
            RUN npm run build<br>
            <br>
            FROM ${PARENT\_IMAGE} as runner<br>
            WORKDIR /app<br>
            ENV NODE\_ENV production<br>
            ENV NEXT\_TELEMETRY\_DISABLED 1<br>
            USER ContainerAdministrator<br>
            <br>
            SHELL ["powershell", "-Command", "$ErrorActionPreference = 'Stop'; $ProgressPreference = 'SilentlyContinue';"]<br>
            <br>
            COPY --from=builder /app/next.config.js ./next.config.js<br>
            COPY --from=builder /app/tsconfig.scripts.json ./tsconfig.scripts.json<br>
            COPY --from=builder /app/tsconfig.json ./tsconfig.json<br>
            COPY --from=builder /app/public ./public<br>
            COPY --from=builder /app/.next ./.next<br>
            COPY --from=builder /app/node\_modules ./node\_modules<br>
            COPY --from=builder /app/scripts ./scripts<br>
            COPY --from=builder /app/src ./src<br>
            COPY --from=builder /app/package.json ./package.json<br>
            COPY --from=builder /app/.graphql-let.yml ./.graphql-let.yml<br>
            <br>
            <br>
            RUN Remove-Item -Path C:\app\.next\static -Force -Recurse;<br>
            <br>
            EXPOSE 80<br>
            EXPOSE 443<br>
            ENTRYPOINT "npm run start:production" |
| --- |

As a result of the above we will get an image with all javascript code precompiled. When image bounds in Kubernetes, "npm run start:production" command will be executed.

Now we have images ready to be run in Azure Kubernetes Services. In this article I don’t describe how to run the whole Sitecore in Kubernetes. It is pretty well described in Sitecore documentation that you can easily download from the site here. The rest of the article only explains how to add the rendering host to the default k8s specification. If you setup your cluster and deploy Sitecore by its documentation, your k8s specification looks like below:  ![sitecore kubernetes specs](https://www.brimit.com/-/media/project/brimit/blog/2022/rh-in-aks/k8s_specs.png)
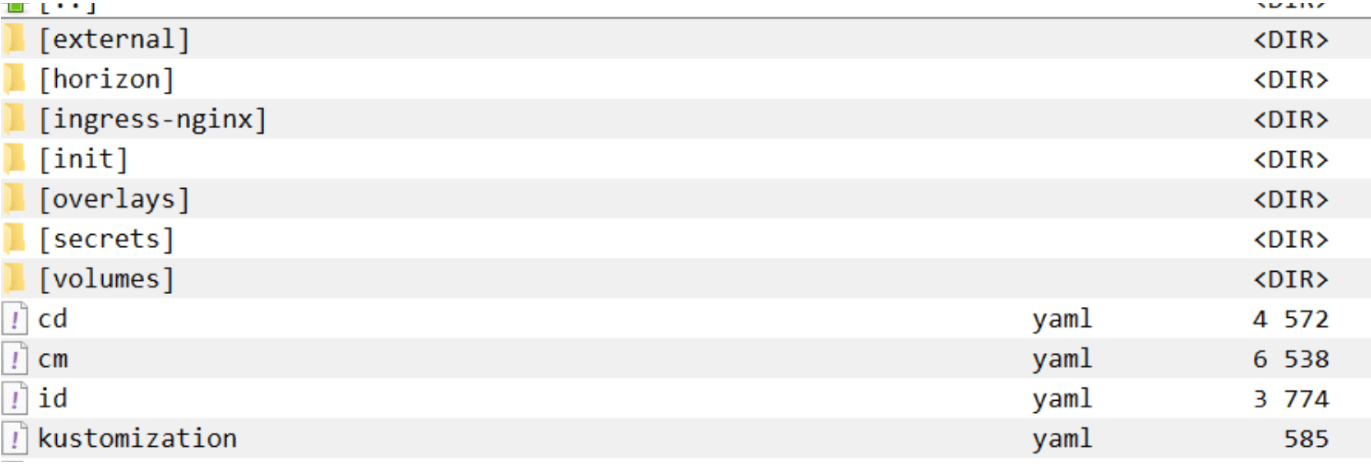

First thing that we have to do, is to add a new yaml file called “rendering” and put there the following configuration:

| apiVersion: v1<br>
            kind: Service<br>
            metadata:<br>
              name: rendering<br>
            spec:<br>
              selector:<br>
                app: rendering<br>
              ports:<br>
              - protocol: TCP<br>
                port: 3000<br>
                targetPort: 3000<br>
            ---<br>
            apiVersion: apps/v1<br>
            kind: Deployment<br>
            metadata:<br>
              name: rendering<br>
              labels:<br>
                app: rendering<br>
            spec:<br>
              replicas: 1<br>
              selector:<br>
                matchLabels:<br>
                  app: rendering<br>
              template:<br>
                metadata:<br>
                  labels:<br>
                    app: rendering<br>
                spec:<br>
                  nodeSelector:<br>
                    kubernetes.io/os: windows<br>
                  containers:<br>
                  - name: [your project name]-rendering<br>
                    image: #{CONTAINER-REGISTRY}##{COMPOSE\_PROJECT\_NAME}#-rendering<br>
                    ports:<br>
                    - containerPort: 3000<br>
                    imagePullPolicy: Always<br>
                    env:<br>
                    - name: DEBUG<br>
                      value: sitecore-jss:\*<br>
                    - name: SITECORE\_API\_HOST<br>
                      value: http://cd<br>
                    - name: NEXTJS\_DIST\_DIR<br>
                      value: .next<br>
                    - name: PUBLIC\_URL<br>
                      value: https://{YOUR-RENDERING-HOST-PUBLIC-URL}<br>
                    - name: JSS\_EDITING\_SECRET<br>
                      Value: {YOUR-JSS-EDITING-SECRET}<br>
                    - name: SITECORE\_API\_KEY<br>
                      valueFrom:<br>
                        secretKeyRef:<br>
                          name: [your project name]-global<br>
                          key: [your project name]-global-api-key.txt<br>
                    - name: JSS\_APP\_NAME<br>
                      valueFrom:<br>
                        secretKeyRef:<br>
                          name: [your project name]-global<br>
                          key: [your project name]-global-jss-app-name.txt<br>
                  imagePullSecrets:<br>
                  - name: regcred |
| --- |

In configuration above we can see the definition of k8s service which is used for communication between environment parties and definition of the rendering deployment which will finally represent our rendering host pod. Take into account that the configuration has environment variables and you need to replace some of them (or all) with your values. As for me, I replace these values during the CI/CD process. 

And the last thing left, is to extend our nginx-ingress controller with one additional rule to forward traffic from you host to the rendering host:

| - host: your-host-name.com<br>
                http:<br>
                  paths:<br>
                  - path: /<br>
                    pathType: Prefix<br>
                    backend:<br>
                      service:<br>
                        name: rendering<br>
                        port:<br>
                          number: 3000 |
| --- |

###### More from author

[##### Deploy custom headless Sitecore solution in Sitecore XM Cloud
November 10, 2022](https://www.brimit.com/blog/deploy-custom-headless-sitecore-solution-in-sitecore-xm-cloud)[##### Running custom next.js editing host in Sitecore XM Cloud
September 29, 2022](https://www.brimit.com/blog/running-custom-next-js-editing-host-in-sitecore-xm-cloud)[##### Running node.js based rendering host in Sitecore Managed Cloud
August 3, 2022](https://www.brimit.com/blog/running-node-js-based-rendering-host-in-sitecore-managed-cloud)

###### Author

[!\[artsiom-photo\](https://www.brimit.com/-/jssmedia/feature/blogs/authors/artsiom-200.jpg?h=202&amp;iar=0&amp;w=200&amp;hash=41797D2540DF6EB6FDF558360F6F62B8)
Artsem Prashkovich
Sitecore MVP/ Solution Architect](https://www.brimit.com/blog/author?authors=Artsem%20Prashkovich)

###### More by category

[#Events](https://www.brimit.com/blog?categories=#Events)[#How-to](https://www.brimit.com/blog?categories=#How-to)[#News](https://www.brimit.com/blog?categories=#News)[#Guides](https://www.brimit.com/blog?categories=#Guides)

###### More by platform

[DXP](https://www.brimit.com/blog?platforms=DXP)[Sales and marketing automation](https://www.brimit.com/blog?platforms=Sales%20and%20marketing%20automation)[Application innovation](https://www.brimit.com/blog?platforms=Application%20innovation)

#### More on Sitecore

[!\[How Vercel Will Help You Save Effort When Deploying Sophisticated Sitecore Projects\](https://www.brimit.com/-/jssmedia/project/brimit/blog/2024/vercel_cover-image.png)
#Guides#How-toDXPE-commerce
##### How Vercel Will Help You Save Effort When Deploying Sophisticated Sitecore Projects
Optimize and accelerate the development and deployment of complex multisite Sitecore projects.
Alexei Vershalovich on July 17, 2024](https://www.brimit.com/blog/how-vercel-will-help-you-save-effort-when-deploying-sophisticated-sitecore-projects)

[!\[Training Up Tomorrow's Sitecore MVPs: a Mentoring Success Story\](https://www.brimit.com/-/jssmedia/project/brimit/blog/2023/sitecore-mentoring---cover-image.png)
#How-toDXP
##### Training Up Tomorrow's Sitecore MVPs: a Mentoring Success Story
How to participate in the Sitecore Mentor program and help younger colleagues jump-start a career in Sitecore development.
Sergey Baranov on October 2, 2023](https://www.brimit.com/blog/training-up-tomorrows-sitecore-mvps)

[!\[Going Headless. Part 2: When a Headless CMS Is Your Best Bet (if you have Sitecore)\](https://www.brimit.com/-/jssmedia/project/brimit/blog/2022/headless/adobestock_456986731.jpg)
#How-toDXPE-commerce
##### Going Headless. Part 2: When a Headless CMS Is Your Best Bet (if you have Sitecore)
Discover how a headless CMS can benefit organizations that use Sitecore.
Daniil Raschupkin, Palina Trokhautsava on September 15, 2022](https://www.brimit.com/blog/going-headless-part-2-when-a-headless-cms-is-your-best-bet-if-you-have-sitecore)

![](https://bat.bing.net/action/0?ti=187017043&amp;tm=gtm002&amp;Ver=2&amp;mid=ea99124a-2cca-49d3-98fb-ffd510b4f57c&amp;bo=2&amp;gtm_tag_source=1&amp;pi=0&amp;lg=en-US&amp;sw=800&amp;sh=600&amp;sc=24&amp;nwd=1&amp;tl=Running%20node.js%20based%20rendering%20host%20in%20AKS&amp;kw=Kubernetes,AKS,JSS,Sitecore,Rendering,Node,JS&amp;p=https%3A%2F%2Fwww.brimit.com%2Fblog%2Frunning-node-js-based-rendering-host-in-aks&amp;r=&amp;lt=278&amp;evt=pageLoad&amp;sv=2&amp;asc=D&amp;cdb=AQAY&amp;rn=133614)